Leveling a Shipping Container on Site: Shims, Corner Checks, and a Door Test
Leveling a shipping container correctly means supporting the corner castings, shimming with the right materials, and trusting the cargo doors as your real test.
 EditorsEditors10 min read
On this page
- Quick answer: what tolerance are we actually aiming for?
- Why it matters: doors, a racked frame, and standing water
- The tolerance that counts, and the door-square test
- Materials for the corners, and the corner-casting rule
- Leveling it, step by step
- What you'll need on hand
- Mistakes worth avoiding
- Coming back to check it later
- Leveling questions, answered
A shipping container that's even slightly out of level doesn't just look crooked — it stops functioning as a sealed steel box. Cargo doors stop closing square, the frame twists a little more every year, and rainwater finds the low corner and settles there. The reassuring part is that leveling a container is a mechanical problem with a mechanical fix, and precision instruments aren't required to get it right.
A 10-step block-and-shim routine is where most guides stop, skipping the 2 things that actually decide whether the job holds: what counts as level enough, and where the container is actually allowed to carry weight. Load travels through a container's 4 corner castings (the reinforced steel fittings used for lifting, stacking, and tie-down) and along the bottom side rails, by design. Shim those points and the box stays square. Shim the middle of a rail instead, and you're fighting the engineering rather than working with it.
We open with the tolerance and the test, then move through the materials, the steps, the tools, and the mistakes that send people back to redo the job.
Quick answer: what tolerance are we actually aiming for?
Aim to have the container level within roughly a quarter to a half inch across the whole unit, front to back, side to side, and corner to corner. Treat that as the working target rather than a lab spec. The test that actually matters is functional: the cargo doors need to swing freely, and the locking bars need to latch square and stay shut without help. Clean-closing doors and a box that doesn't rock mean the container is level enough. Carry the weight under the 4 corner castings (plus the mid-points on a 40ft unit), never under the middle of the side rails, and check again once the ground has had time to settle.
Why it matters: doors, a racked frame, and standing water
This isn't a cosmetic step. 3 specific failures trace directly back to an out-of-level container, and every one of the 3 gets worse with time instead of better.
The doors quit working properly. Heavy steel slabs hung on a rigid frame, a container's doors stay aligned only as long as that frame stays square. Drop 1 corner low and the door opening shifts from a rectangle toward a slight parallelogram. From there the doors bind, the locking bars stop seating, and you're forcing shut a latch that should close on its own. Nothing signals a badly sited container more clearly than doors that won't latch square.
The frame goes out of square. Racking happens when a steel frame's 4 corners fall out of the same plane, twisting the whole structure diagonally. From there, a racked container carries its load through a permanently distorted frame, which can surface as oil-canning — a visible flexing or rippling across the large flat wall and roof panels. The longer a unit sits racked, the more that distortion locks in, and the tougher it gets to square the doors up again.
Water collects and rusts out the low corner. Both the roof and floor are designed to shed water toward the ends and off the sides. Tilt the box, though, and rain runs to the low corner instead, sitting on the roof seam and attacking the steel from outside while trapped condensation works on it from within. That's where rust gets its start, and it's usually somewhere you won't spot easily.
The tolerance that counts, and the door-square test
A surveyor isn't necessary here. Run 2 checks together and they tell you everything you need to know.
The number check. Get the unit within about a quarter to a half inch of level across its full length and width. Read that with a 4-foot level, or a long straightedge with a level set on top, and check the long runs rather than trusting a single spot reading. Take 3 separate readings: lengthwise along each side rail, widthwise across both ends, and diagonally from corner casting to corner casting. Most people skip the diagonal check, which happens to be the one that catches a twisted, racked frame that the other 2 readings can miss entirely.
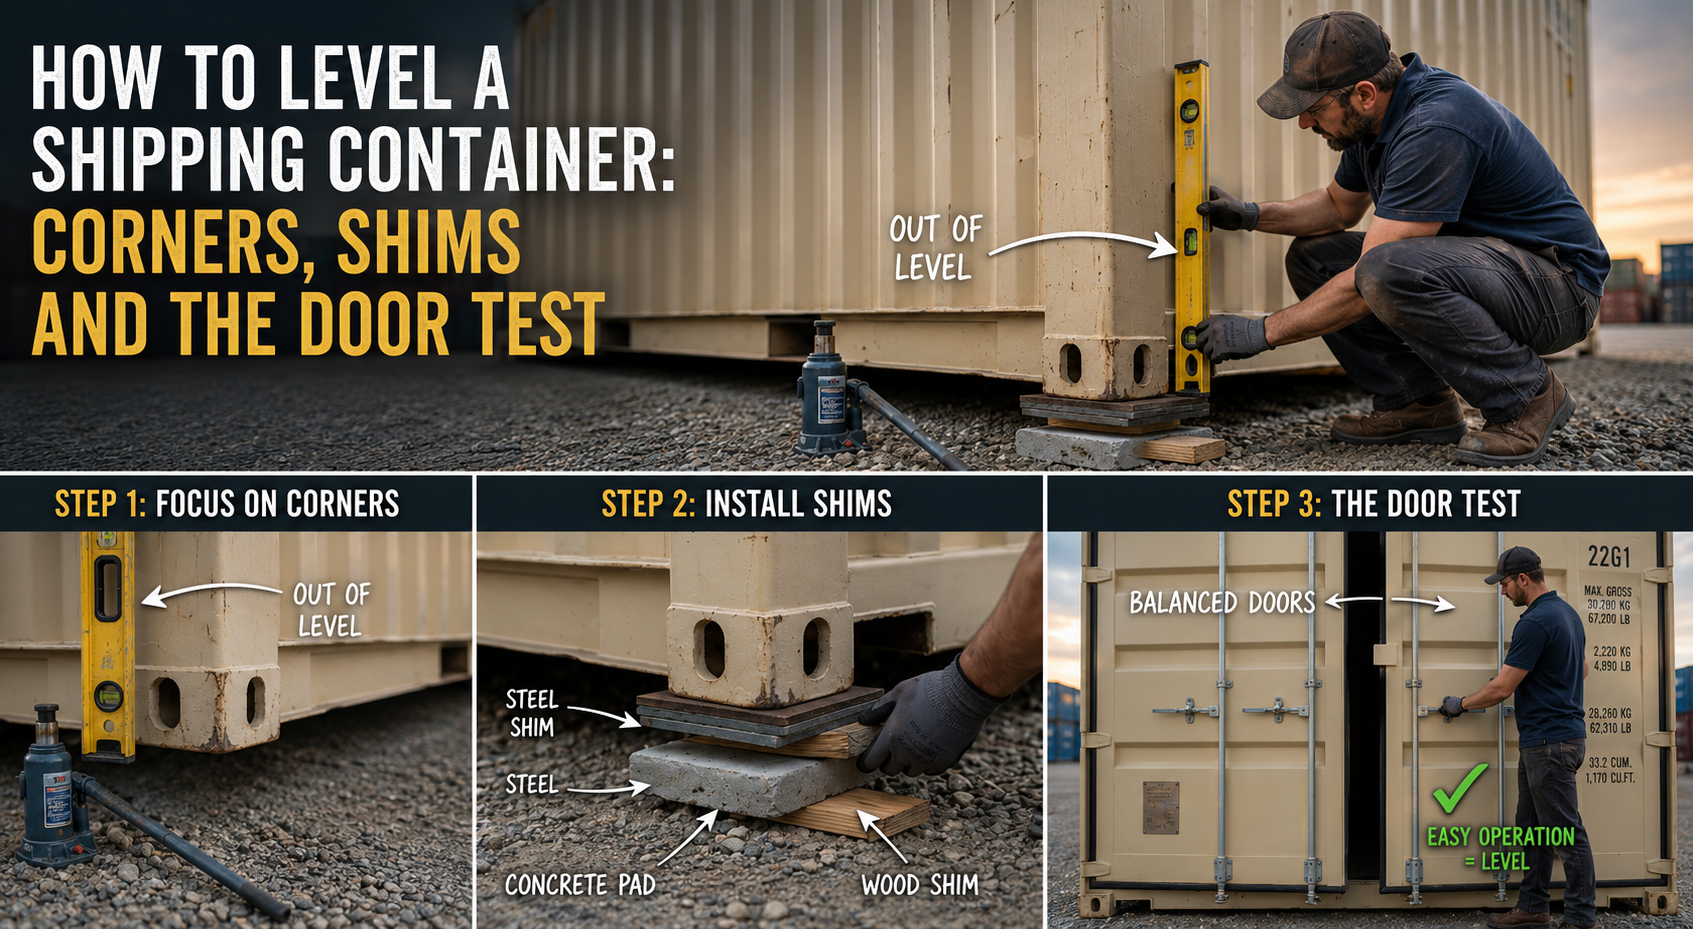
The door-square test itself. This is the test that matters most, since it measures the thing you actually care about. Once the container is roughly level, open and close both cargo doors: they should swing without dragging, the locking bars should rotate into their keepers without resistance, and a closed door should stay shut without you leaning on it. A door that sags, or bars that won't seat, mean the frame is still out of square, so keep adjusting the corner supports until both doors close clean. Pass the door test and the container is level enough for storage, an office conversion, or whatever else you have planned for it.
Materials for the corners, and the corner-casting rule
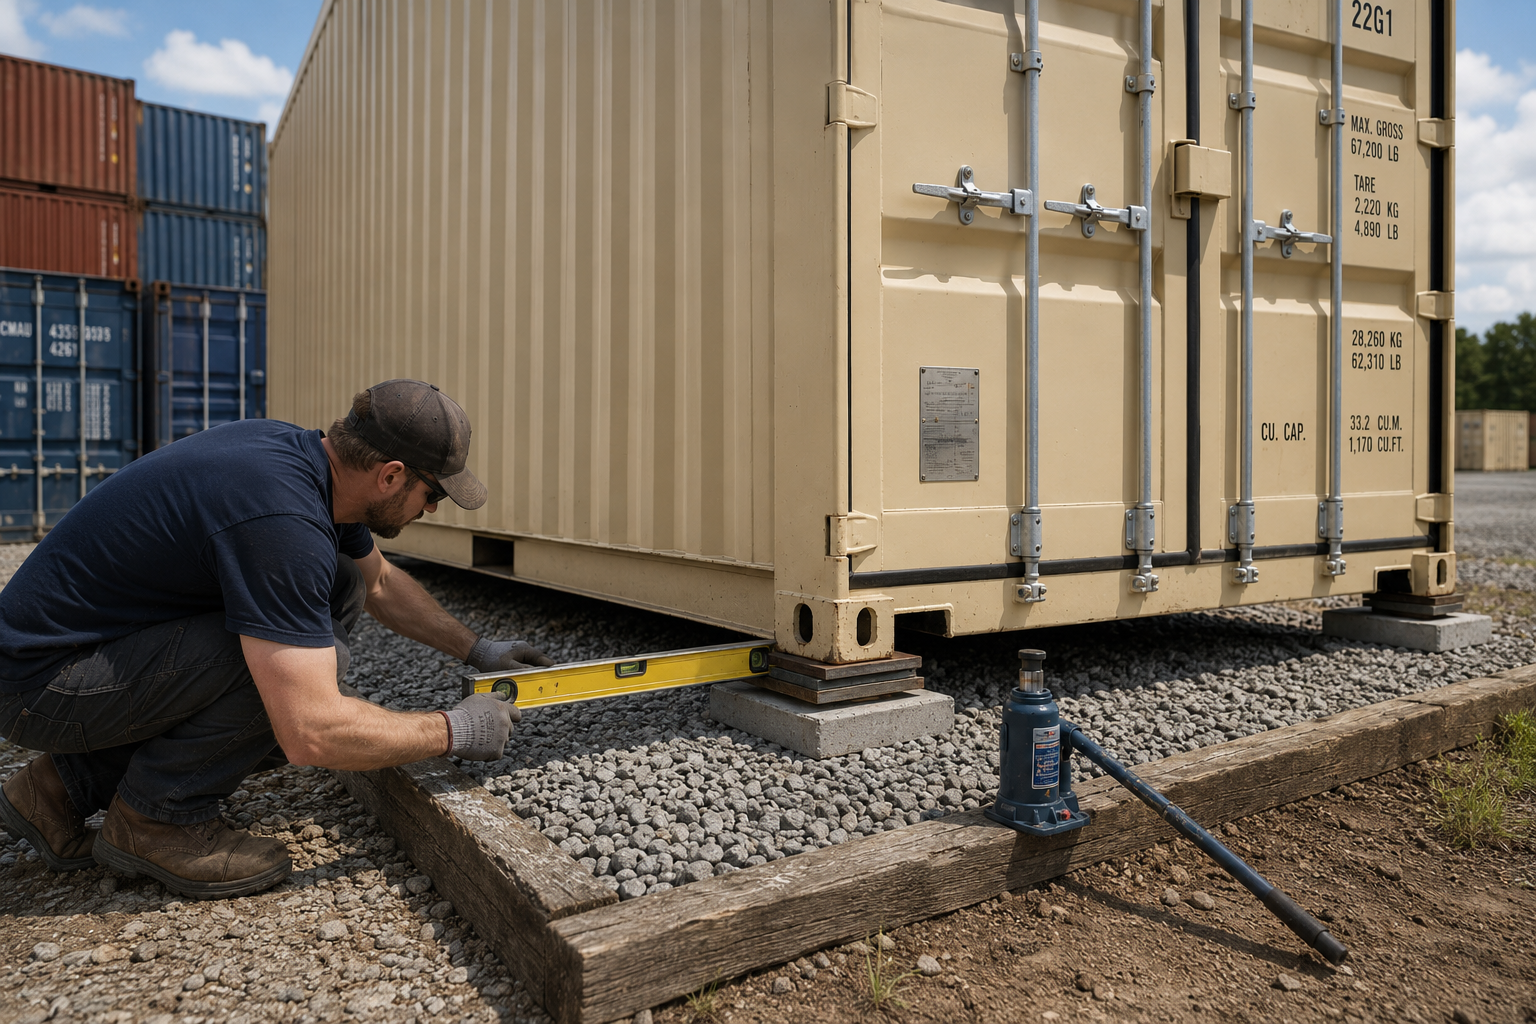
One rule governs everything that goes under a container: the corner castings carry the load, plus the bottom-rail mid-points on a 40ft unit, and the unsupported middle of a rail should never be shimmed. Put the load on the corners and the box performs exactly like the bridge structure it was engineered to be. Jack up a rail's midpoint instead, and you push the frame straight toward the racking and oil-canning you're trying to prevent.
A 20ft container rides on 4 solid bearing points, 1 under each corner casting. A 40ft container runs long enough for the bottom rails to sag between the ends, so it needs additional support near the mid-span, bringing the total to roughly 6 bearing points. Mid-support matters more as the unit gets longer and heavier. A high cube, 1 foot taller than a standard container at 9ft 6in, follows that same corner-load rule regardless; extra height adds volume, not a different destination for the weight.
Stick to materials that won't crush, rot, or wash out:
- Steel plate shims. Flat, load-rated pads spread the bearing load without compressing, and you can stack them for fine height adjustments.
- Solid concrete block. Choose solid units, never hollow cinder blocks, since hollow blocks can crack and collapse under a corner load. Concrete piers or pads accomplish the same thing on a permanent basis.
- Pressure-treated lumber. Treated railroad ties or heavy timber rated for ground contact will hold up against rot in wet soil.
Rule out untreated or rotting wood, thin pavers prone to cracking, and loose bricks. A shim that gives out after 2 years drops a corner and undoes the whole job, and you won't know until the doors stop latching, not a moment sooner.
Leveling it, step by step
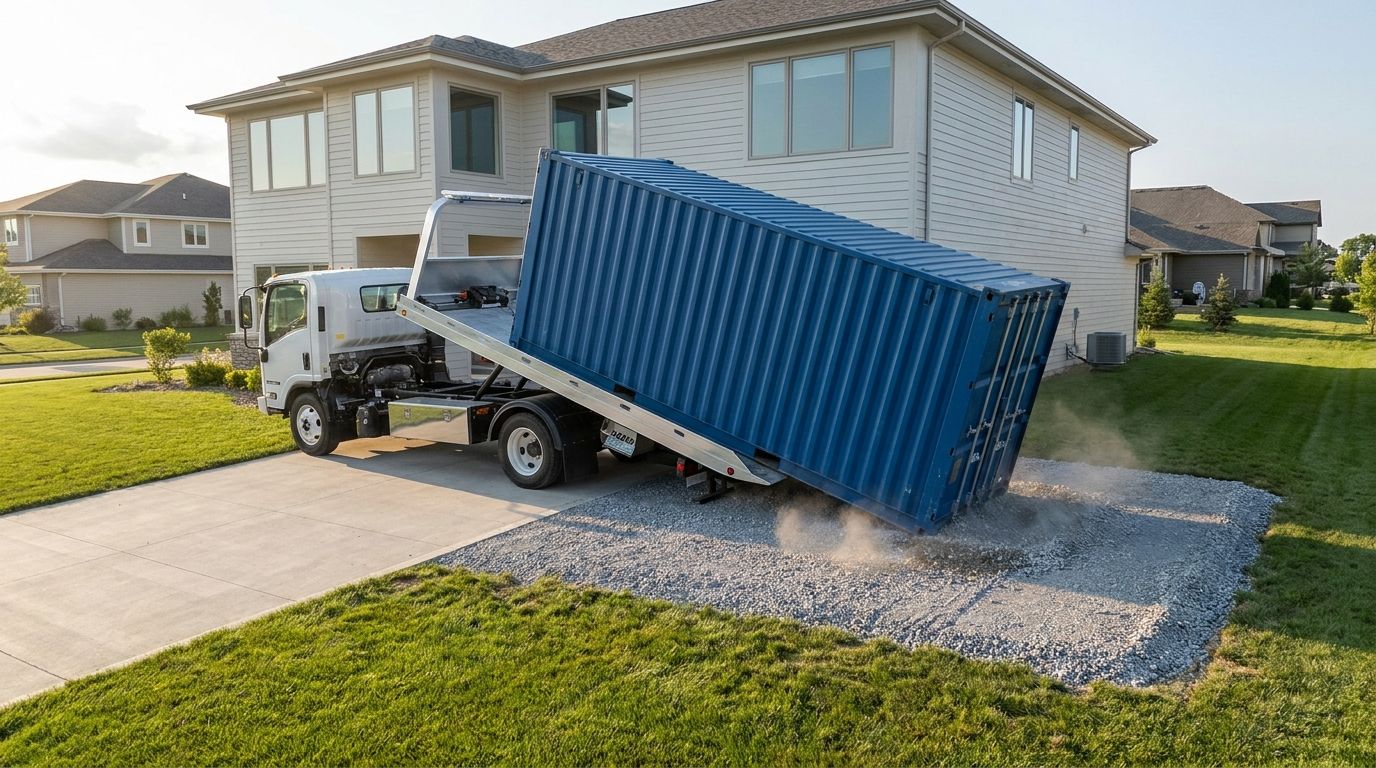
These steps assume the unit is landing on a base that's already prepared. A firm, well-drained surface, typically a compacted gravel pad, handles most of the leveling before a single shim ever goes in, since the tilt-bed truck (a delivery trailer whose bed tilts down to slide the container off) needs level, firm ground just to set the box down evenly to begin with.
- Get the base right before you touch a shim. Land the container on firm, drained ground, ideally a compacted gravel pad already graded close to level. Shims are meant to correct the last fraction of an inch, not fix soft or sloped ground. For the site and access work that has to happen before this stage, see the steps in the guide to prepping for delivery.
- Locate the high corner. Check the level against each of the 4 corner castings in turn. Whichever corner reads highest becomes your reference point, since you bring the other 3 up to match it instead of digging the high one down.
- Build up and shim the low corners. Working 1 corner at a time, lift or pack material under each low casting until it matches the height of your reference corner. Stack steel plates, solid concrete, or treated timber to whatever height gets you there, and keep the bearing point directly beneath the casting itself.
- Support the rail mid-span on a 40ft unit. On a 40ft container, place bearing points near the mid-span of each bottom side rail to stop the rails sagging between the ends. A 20ft unit doesn't need this — it rides entirely on its 4 corners.
- Re-check level in all 3 directions. Take level readings lengthwise along each side, widthwise across each end, and diagonally from corner to corner. Keep adjusting shims until every one of the 3 readings falls within the quarter-to-half-inch target.
- Test the doors. Swing both doors open and closed. Free movement, a square latch, and doors that stay shut mean you're finished. Otherwise, the frame remains out of square, so return to whichever corner is causing the problem and adjust from there.
- Make sure nothing rocks. Press down on each corner in turn. Any rocking means a corner isn't fully bearing weight yet, so reseat that shim until it is.
What you'll need on hand
- A 4-foot level (or a shorter one set on a long straightedge) for accurate readings across the long runs.
- A bottle jack, or a high-lift farm jack, rated to handle more than the corner load, for raising 1 corner at a time.
- Options for shimming: pressure-treated timber, solid concrete blocks or piers, or steel plates.
- A pry bar, a shovel for grading, and a hand tamper if the gravel base needs firming up.
- A tape measure for confirming both diagonals come out equal.
None of this calls for surveying equipment or a laser level. The container's own doors are the most accurate instrument you have for the result that actually counts.
Mistakes worth avoiding
- Shimming a rail's midpoint. This is the most damaging mistake you can make, and it pushes the frame straight toward racking and oil-canning. Load only the corners, plus the mid-points on a 40ft unit.
- Fixating on a flawless reading and skipping the door test. A single spot reading dead flat while the door test fails is a sign the frame is twisted. Trust what the doors tell you over a single number.
- Leaving out the diagonal check. A box can sit racked while both the lengthwise and widthwise readings look fine. Only the corner-to-corner read catches that.
- Reaching for hollow blocks or rotting wood. Hollow cinder blocks crack under a corner load, and untreated wood rots away and drops the corner with it. Stick to solid, rot-resistant material instead.
- Trying to level on soft or sloped ground. No amount of shimming rescues a bad base. Get the ground firm and drained before anything else.
- Skipping the re-check. Newly disturbed ground keeps settling. A container that was dead level on delivery day can drift out of level over the following weeks.
Coming back to check it later
A container carries real weight, and the ground beneath a new pad compresses unevenly during the first weeks, especially after rain or a freeze. Check the level again once the site has had time to settle, then once more after the first hard winter in cold climates, since frost heave can lift 1 corner as the ground freezes and thaws (the frost line is the depth to which soil freezes locally, and corners sitting above shifting soil move right along with it). The check itself is quick — read the 3 planes and run the door test. Re-shim a dropped corner the same way you set it originally. A quarter-inch shift caught early is a 5-minute fix; the same shift ignored until the doors bind turns into a much longer afternoon.
Leveling questions, answered
What level of precision does a shipping container actually require?
The working target is roughly a quarter to a half inch across the whole unit. More telling than any single number, though, is the door test: cargo doors that swing freely, latch square, and stay shut on their own mean the container is level enough.
Is it possible to level a container on bare dirt?
Setting one on soil that's firm, drained, and graded is possible, but a compacted gravel pad drains better and stays level much longer. Rain softens bare dirt and lets corners settle, and that's exactly when doors start to bind. Most of the leveling work happens at the base, before a single shim goes in.
Why not simply shim under the container's middle?
Because the weight travels through the corner castings and the bottom side rails, not the floor. Lift a rail's middle and you twist the frame, racking the box and potentially rippling the wall panels (oil-canning). Load the corners every time, plus the mid-points if it's a 40ft unit.
How frequently should the level get checked again?
Check again during the first weeks while the ground settles, then once more after the first hard winter if you're in a cold climate where frost heave can lift a corner. Beyond that, a quick check whenever a door starts to bind is enough.
For anyone still working through site setup, the steps in getting your property ready for container delivery walk through the ground, access, and clearance work that has to happen ahead of leveling. For the complete picture on bases and footings, see the shipping container foundations hub.
Looking to get a container sitting level on your own ground? Request a free quote and we'll pair the right container and delivery plan to your site, or browse containers to compare sizes and conditions. A 20ft standard dry one-trip unit handles storage and conversion projects as the general-purpose steel box, while the 40ft high cube used unit delivers the most usable volume for the money.